Thursday 16 April 2015

Developer Unlock a Windows Phone for Free

 Windows Phones limits the deployment/installation of non-store apps to only Developer Unlocked phones and still carries a limit of max 3 apps for users without a Microsoft Developer Account. If you are looking to Developer Unlock your Windows Phone (regardless of the manufacturer), follow the tutorial below. 

Register a Windows Phone for Development (Developer Unlock)

  1. If you are just an end user who wants to unlock the phone to deploy some apps, download theWindows Phone Mini SDK (64MB) from here.
    On the other hand, if you are a developer and plan to build apps, you should download the Full WP8 SDK from here.
  2. Install the Mini SDK or the Full SDK on your Windows PC.
  3. Connect your Windows Phone device to the PC using a USB Cable and wait for the drivers to be installed (if they are not already installed).
  4. Click Start and type Developer Registration. Now open Windows Phone Developer Registration app.
    register development wp sdk
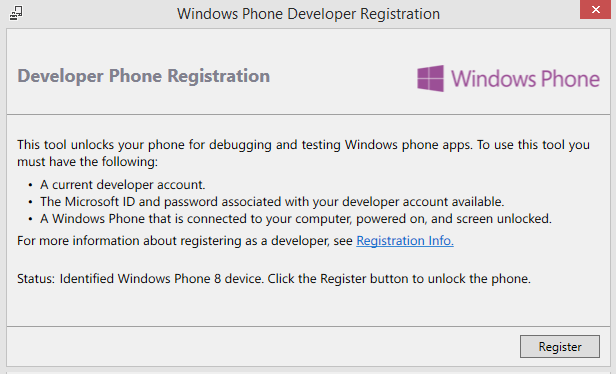
    Register for Development
  5. Make sure that the screen of your Windows Phone is unlocked and click on Register in the bottom-right of Developer Registration App. Click retry if it says that the phone is not detected.
  6. Login by entering your Microsoft Account credentials. You do not need to be registered as a developer to do the unlocking, hence any Microsoft Account will work.
  7. Let the Developer Registration app register your phone for development and you can deploy local/cracked apps thereafter.
    successfully unlocked
    Unlocked Phone Message

Unregister a Windows Phone for Development (Lock Development)

If you no longer need the capabilities offered by the Developer Unlock, you can lock it back again by following the above steps and choosing Unregister in Step 5.

Difference between WP8 Mini SDK and Full WP8 SDK

WP8 Mini SDK
  1. Contains only the Developer Registration and App Deployment tools.
  2. Size – 64MB.
  3. Works on Windows 7 or later (both 32-bit and 64-bit)
  4. Good for App Deployment.
  5. Quick Install of 5 minutes.
WP8 Full SDK
  1. Full set of tools used for development purpose.
  2. Size – Around 3.5GB (inc. Visual Studio)
  3. Works only on 64-bit version of Windows 8.
  4. Needed for Development.
  5. Takes more than 30 minutes to install on an average PC.

Monday 16 March 2015

MAKE YOUR OWN RADIO STATION AND BROADCAST YOUR LIVE MUSIC TO WORLD...!!!

Step 1:)
           You All First need to gather some tools they are
            a) WINAMP media player you can download it from  Winamp
            b) Some Plug-in from Plug-in tool
Step 2:)
           Install both all the tools order doesn't matter

Step 3:)
            Open Winamp then goto Option > preferences in the pop up windows navigate to
            DSP/effect and select "Nullsoft Shoutcast sourec DSP v2.2.1 [dsp_sc.dll ]"
            
Step 4:)
            After selecting close Winamp and re-open it and when you re-open it a new window will pop-up in the screen
minimize winamp follow below step

Step 5:)
             visit this web site listen2myradio.com and create a free account for radio streaming after sign up go to your email address that you have given while sign up and activate your account after that login to your account
Step 6:)
           After login you have to set up your web player just follow web instruction
         after that the shout-cast will provide you with ip address and port for your stream
  Step 7:)
             Unminimize winamp now in the shoutcast window select output and in the connection tab below type in the stream ip and the port number and also type in the pass word in the password place(NOTE: the password is the password of your account that you had created in listen2myradio.com)
now goto yellowpages tab if you want to publicly publish your radio on shoutcast.com the check the box where it says " make this server public"
and below you type in the description about your radio channel in the description field and also the url for your radio in URL field
after that connect and see that you are connected and a flow of byte will appear

now you are done
Step 8:)
           to check the radio streaming play some audio on winamp and open vlc player after 3mint when vlc open press CTRL+N
 place the ip and port like this http://87.117.205.151:10019 and press play and you will fine that vlc is now playing your broadcasted stream.. :)

now enjoy My Friends Your Own Radio Channel Broadcast your fav8 music.. :)
#Thanks for Reading

Websites that will Find Missing DLL Files

Solution is very simple. Just take the name of the files which is missing and search for it On the below websites.


#1. DLL-FILES.COM


dll-files.com is the best website which helps you to fix the missing dll files, thats the reason why it is on top among the three sites i m going to tell you.
dll-files.com allows you to search for you dll missing file. Just input the name and click on search. rest will be done by it. Just download it.
 It also helps you to Search for your missing files in Alphabetical order in case you are unable to search you desired dll missing file.


#2. DLLDLL.COM

Another Great site To find Missing Dll Files is dlldll.com, This site Consist or more than 16 million Dll Files That You Need it. This site Consist of Huge Collection of dll Files which are well organized and you can find Your Desired Missing Dll file with Ease.


#3. DLLME.COM

dllme.com Also helps you to find you missing dll files with a very user friendly Interface and easy to Find.

So above 3 sites will help you to Get a sure solution to your Problem of Missing Dll files error.
#Thanks for Reading

101 Important Websites


01. screenr.com – record movies of your desktop and send them straight to YouTube.

02. bounceapp.com – for capturing full length screenshots of web pages.

03. goo.gl – shorten long URLs and convert URLs into QR codes.

04. untiny.me – find the original URLs that’s hiding behind a short URLs.

05. localti.me – know more than just the local time of a city

06. copypastecharacter.com – copy-paste special characters that aren’t on your keyboard.

07. topsy.com – a better search engine for twitter.

08. fb.me/AppStore – search iOS apps without launching iTunes.

09. iconfinder.com – the best place to find icons of all sizes.

10. office.com – download templates, clipart and images for your Office documents.

11. woorank.com – everything you wanted to know about a website.

12. virustotal.com – scan any suspicious file or email attachment for viruses.

13. wolframalpha.com – gets answers directly without searching  – see more wolfram tips.

14. printwhatyoulike.com – print web pages without the clutter.

15. joliprint.com – reformats news articles and blog content as a newspaper.

16. isnsfw.com – when you wish to share a NSFW page but with a warning.

17. e.ggtimer.com – a simple online timer for your daily needs.

18. coralcdn.org – if a site is down due to heavy traffic, try accessing it through coral CDN.

19. random.org – pick random numbers, flip coins, and more.

20. mywot.com – check the trust level of any website – example.

21. viewer.zoho.com – Preview PDFs and Presentations directly in the browser.

22. tubemogul.com – simultaneously upload videos to YouTube and other video sites.

23. truveo.com – the best place for searching web videos.

24. scr.im – share you email address online without worrying about spam.

25. spypig.com – now get read receipts for your email.

26. sizeasy.com – visualize and compare the size of any product.

27. whatfontis.com – quickly determine the font name from an image.

28. fontsquirrel.com – a good collection of fonts – free for personal and commercial use.

29. regex.info – find data hidden in your photographs – see more EXIF tools.

30. tineye.com – this is like an online version of Google Googles.

31. iwantmyname.com – helps you search domains across all TLDs.

32. tabbloid.com – your favorite blogs delivered as PDFs.

33. join.me – share you screen with anyone over the web.

34. onlineocr.net – recognize text from scanned PDFs and images – see other OCR tools.

35. flightstats.com – Track flight status at airports worldwide.

36. wetransfer.com – for sharing really big files online.

37. pastebin.com – a temporary online clipboard for your text and code snippets.

38. polishmywriting.com – check your writing for spelling or grammatical errors.

39. awesomehighlighter.com – easily highlight the important parts of a web page.

40. typewith.me – work on the same document with multiple people.

41. whichdateworks.com – planning an event? find a date that works for all.

42. everytimezone.com – a less confusing view of the world time zones.

43. warrick.cs.odu.edu – you’ll need this when your bookmarked web pages are deleted.

44. gtmetrix.com – the perfect tool for measuring your site performance online.

45. imo.im – chat with your buddies on Skype, Facebook, Google Talk, etc. from one place.

46. translate.google.com – translate web pages, PDFs and Office documents.

47. youtube.com/leanback – sit back and enjoy YouTube videos in full-screen mode.

48. similarsites.com – discover new sites that are similar to what you like already.

49. wordle.net – quick summarize long pieces of text with tag clouds.

50. bubbl.us – create mind-maps, brainstorm ideas in the browser.

51. kuler.adobe.com – get color ideas, also extract colors from photographs.

52. followupthen.com – setup quick reminders via email itself.

53. lmgtfy.com – when your friends are too lazy to use Google on their own.

54. tempalias.com – generate temporary email aliases, better than disposable email.

55. pdfescape.com – lets you can quickly edit PDFs in the browser itself.

56. faxzero.com – send an online fax for free – see more fax services.

57. feedmyinbox.com – get RSS feeds as an email newsletter.

58. isendr.com – transfer files without uploading to a server.

59. tinychat.com – setup a private chat room in micro-seconds.

60. privnote.com – create text notes that will self-destruct after being read.

61. flightaware.com – live flight tracking service for airports worldwide.

62. boxoh.com – track the status of any shipment on Google Maps – alternative.

63. chipin.com – when you need to raise funds online for an event or a cause.

64. downforeveryoneorjustme.com – is your favourite site really offline?

65. example.com – this website can be used as an example in documentation.

66. whoishostingthis.com – find the web host of any website.

67. google.com/history – found something on Google but can’t remember it now?

68. errorlevelanalysis.com – find whether a photo is real or a photoshopped one.

69. google.com/dictionary – get word meanings, pronunciations and usage examples.

70. urbandictionary.com – find definitions of slangs and informal words.

71. seatguru.com – consult this site before choosing a seat for your next flight.

72. sxc.hu – download stock images absolutely free.

73. imo.im – chat with your buddies on Skype, Facebook, Google Talk, etc. from one place.

74. wobzip.org – unzip your compressed files online.

75. vocaroo.com – record your voice with a click.   The 101 Most Useful Websites  4

76. scribblemaps.com – create custom Google Maps easily.

77. buzzfeed.com – never miss another Internet meme or viral video.

78. alertful.com – quickly setup email reminders for important events.

79. encrypted.google.com – prevent your ISP and boss from reading your search queries.

80. formspring.me – you can ask or answer personal questions here.

81. snopes.com – find if that email offer you received is real or just another scam.

82. typingweb.com – master touch-typing with these practice sessions.

83. mailvu.com – send video emails to anyone using your web cam.

84. ge.tt – quickly send a file to someone, they can even preview it before downloading.

85. timerime.com – create timelines with audio, video and images.

86. stupeflix.com – make a movie out of your images, audio and video clips.

87. aviary.com/myna – an online audio editor that lets you record and remix audio clip.

88. noteflight.com – print music sheets, write your own music online (review).

89. disposablewebpage.com – create a temporary web page that self-destruct.

90. namemytune.com – when you need to find the name of a song.

91. homestyler.com – design from scratch or re-model your home in 3d.

92. snapask.com – use email on your phone to find sports scores, read Wikipedia, etc.

93. teuxdeux.com – a beautiful to-do app that resembles a paper dairy.

94. livestream.com – broadcast events live over the web, including your desktop screen.

95. bing.com/images – automatically find perfectly-sized wallpapers for mobiles.

96. historio.us – preserve complete web pages with all the formatting.

97. dabbleboard.com – your virtual whiteboard.

98. whisperbot.com – send an email without using your own account.

99. sumopaint.com – an excellent layer-based online image editor.

100. lovelycharts.com – create flowcharts, network diagrams, sitemaps, etc.

101. nutshellmail.com – Get your Facebook and Twitter streams in your inbox
#Thanks for Reading

Stupid Geek Tricks: Hide Data in a Secret Text File Compartment

Ever since Windows 2000, the NTFS file system in Windows has supported Alternate Data Streams, which allow you to store data “behind” a filename with the use of a stream name. It’s not detectable while browsing the file system, or anywhere within Windows… you can only access it with the “secret key” which is really just the name of the stream.
image
You can think of these extra streams as secret compartments within the file that can only be accessed if you know the “secret code,” which in this case is just the name of the stream.
This isn’t a completely secure way to hide data as we’ll illustrate below, but it’s a fun trick to know about in a pinch.
Note: This only works on a drive formatted with NTFS.

Hiding Data in a Secret Compartment

In order to use this feature, you’ll have to open a command prompt and use the following syntax:
notepad SomeFile.txt:SecretWordHere.txt
You can use anything after the colon as a secret word, the key is that there can’t be any spaces between the first filename and the colon.
image
If you didn’t specify .txt on the end, Notepad will automatically add it, and ask if you want to create a new file, even if SomeFile.txt already existed, because SecretSquirrel!.txt doesn’t already exist.
image
Now you can enter in whatever data you want here and save the file:
image
When you look at the file, it will still be the exact same size as before:
image
You can even open up the file by double-clicking on it, and add whatever data you want to make the file look normal:
image
You can use the command line again to add a second hidden “compartment” with a different name:
image
You can add whatever other information to this file that you’d like:
image
None of these hidden files will affect the other, or change the main file. Just remember, you have to use the command line to access the hidden data.
Note: Once you create a hidden stream, that stream isn’t exactly part of the file… you can’t copy your file to another location and access the streams over there.

Detecting Files with Streams

Of course these files aren’t completely hidden from everybody, because you can use a small command line application called Streams.exe to detect files that have streams, including the names of the streams.
For instance, in my scenario we’d use the following syntax:
streams.exe SomeFile.txt
image
As you can see, the names of the streams are shown, which would allow you to easily access them.
If you’re using Windows 7, you can simply use the /R argument to the DIR command to see the streams:
image

Deleting Streams

You can use the same Streams.exe command to delete all streams from a file, although I don’t think you can delete just a single stream. Use the following syntax:
streams.exe -d SomeFile.txt
image
As you can see in the screenshot, the streams are now removed from the file.

Adding to Hidden Streams from the Command Line

You can add data to a hidden stream by using a number of commands, or really anything that can pipe input or output and accept the standard FileName:StreamName syntax. For instance, we could use the echo command:
echo “Neat!” > SomeFile.txt:Test
image
You can see with the streams command in the example above that we now have a hidden stream on the file.

Reading a Stream From the Command Line

You can read data from the stream by piping data into the more command, using this syntax:
more < FileName:StreamName
In my example the actual command was this:
more < SomeFile.txt:SecretSquirrel!.txt
image
As you can see, the secret data that we added is outputted to the console.

Of course, this isn’t a secure way to hide data—for that you should use TrueCrypt. It’s just one of those things that can be fun to use and might come in handy here or there.
Learning is fun, isn’t it?

How to Get a List of Installed Software on Your PC

Getting a list of installed software is as simple as using this straightforward WMI query.


Get-WmiObject -Class Win32_Product | Select-Object -Property Name
image
You will probably want to export that to a file though, which is also easy enough — we’ll send the output using the > symbol and adding the path to a new text file that we want to create.
Get-WmiObject -Class Win32_Product | Select-Object -Property Name > C:\Software\PCapps.txt
image
What makes using PowerShell really neat is that if you do this on two different machines, you can easily compare the software installed on them.
Compare-Object -ReferenceObject (Get-Content C:\Software\PCapps.txt) -DifferenceObject (Get-Content C:\Software\LAPTOPapps.txt)
image
Any entries with a side indicator pointing to the right (=>) mean that the software is installed on my laptop but  not on my PC, and any entries with a side indicator pointing to the left (<=) mean that the software is installed on my PC but not on my laptop.
#Thanks for Reading

New To Linux? Don’t Use Ubuntu, You’ll Probably Like Linux Mint Better

The Issues With Ubuntu

The standard File/Edit/View menu is completely separated from each window and appears on the top bar, like a Mac. This is unusual for Windows users. Worse yet, the File/Edit/View menu is actually hidden until you move your mouse up to the bar, and then it appears. This is just unnecessarily confusing.Let’s take a quick look at Ubuntu’s Unity desktop first. New users (and even experienced Linux users) will have many issues with it:
  • The window management buttons (close, minimize, and maximize) appear at the top-left side of each window instead of the top-right side. This is more like Mac OS X than Windows. There used to be a hidden option to move these buttons back to the right side, but it no longer works.
  • The Unity desktop features a sort of dock, known as a launcher, that displays shortcuts to your applications and to running applications. You can’t get a more traditional taskbar, if you prefer that, as you can on Windows. The launcher also always appears at the left side of the screen. You can’t move it to another edge of the screen, as you can on Windows and Mac.
  • The application launcher is rather confusing. Rather than being an easy pop-up menu with a list of useful shortcuts, it’s a full-screen search interface by default. To actually view a list of installed applications, you have to click the Ubuntu shortcut and select the little Applications view icon at the bottom of the screen. You then need to click “See more results” next to your installed applications and you’ll get a full, alphabetized list of applications without any categories or other useful information. The so-called “dash” interface works best if you use it for search, and you’ll see Amazon search results if you do that. Other options you might expect to find in a “Start menu”-style menu appear in the indicator menus at the top-right corner of the screen.
Let’s be honest, it can be easy for a new user to become confused by this interface. Even seasoned Linux users — rather, especially seasoned Linux users who cut their teeth on earlier desktops — may not find this interface to be the most comfortable.

Why Linux Mint is More Comfortable (and Awesome)


We tend to prefer Cinnamon, as it includes more of the latest technologies. But that doesn’t mean it’s as quirky as Ubuntu’s Unity. The Cinnamon desktop includes a pop-up menu for launching applications and managing settings that works like you’d expect it to. It has a familiar taskbar, which can be moved to other edges of your screen. Its window management buttons are in the place Windows users will expect them. Its File/Edit/View menus work normally and are part of each window. If you’ve used Windows — or if you last used Linux a while ago and prefer more traditional desktop environments — Cinnamon is a great option.
Linux Mint offers two primary flavors. One has the Cinnamon desktop, a more moderndesktop environment, while another offers the MATE desktop, which is a “fork” of the older GNOME 2 desktop previously used by Ubuntu and other Linux distributions.
MATE isn’t that bad either. It’s a more traditional desktop environment — right down to the underlying code — and Mint configures it to look and work a lot like Cinnamon does. Yes, there’s a simple applications menu, a taskbar, and everything!
This is just the desktop interface stuff, though. Mint has some other advantages, having “questionable stuff” like multimedia codec support and the Flash browser plug-in installed by default. This was Linux Mint’s original reason for existence. If you’re a hardcore open-source geek, this is no good. However, if you’re the average Linux user, you’ll probably want to install this stuff anyway.
But Ubuntu has made this easier, too, and all it takes is a single click in the Ubuntu installer to install this extra stuff.

Linux Mint is Basically Ubuntu

There’s a lot of software in Ubuntu’s software repositories, and many applications (like Valve’s Steam for Linux) officially target Ubuntu as their supported Linux distribution. That’s one reason to prefer Ubuntu.
But Linux Mint is actually extremely close to Ubuntu. It uses Ubuntu’s software repositories, so you have access to all the software provided by Ubuntu. It even uses the updates Ubuntu provides, although Ubuntu’s developers and Mint’s developers have clashed over Linux Mint’s more conservative approach to potentially dangerous updates.

You can also try other official Ubuntu derivatives with different desktops, of course. The Xubuntu desktop with Xfce is probably the most traditional one. But, for many users, the Cinnamon desktop walks a nice line between being modern-but-traditional. Despite being older, the MATE desktop based on GNOME 2 may be more comfortable and capable than the Xfce desktop to many people.
Linux Mint is also focused on just providing a polished desktop interface, while Canonical is chasing the unification of desktop and smartphone with the latest releases. That may pay off in the long term, but it hasn’t yet.
This isn’t the last word, of course. Feel free to try Ubuntu, especially if you’re not the biggest fan of Mint. Or try other Linux distributions! But don’t just download Ubuntu and bounce off of the Linux desktop because Ubuntu’s Unity desktop doesn’t work for you. It doesn’t work for a lot of Linux users.
#Thanks for Reading

Sunday 15 March 2015

How to Sync Files with Your One Drive Account on Ubuntu 14.04


In June 2014, Microsoft raised the amount of storage you get with a free OneDrive account to 15GB, from 7GB. Now that you have all this free online storage, why not use it? I use Ubuntu, not Windows, you say. No worries. There is a solution.
The first step is to download the program from GitHub. Open the Files Manager and navigate to the directory into which you downloaded the file. To extract the contents of the .zip file, right-click on the file and select “Extract Here.”
01_extracting_onedrive_d
Open the folder you extracted, “onedrive-d-master.”
02_opening_extracted_folder
In the “onedrive-d-master” folder, you’ll find an installation script which will handle installation of the program and the required dependencies. To run this script, we will use the Terminal.
03_install_script
Press Ctrl + Alt + T to open a Terminal window. At the prompt, change to the “onedrive-d-master” directory. If you need help changing directories, see our article about using the Linux Terminal.
04_change_directory
To install OneDrive-D, type the following command at the prompt and press “Enter.”
sudo ./inst install
Type your password when prompted and press “Enter.”
05_running_install_script
The progress of the installation displays and then a message displays saying how much disk space will be used. When asked if you want to continue, type a “Y” and press Enter.
06_do_you_want_to_continue
When the installation is finished, the OneDrive-D “Settings” dialog box displays. First, you’ll need to connect to your OneDrive account. To do so, click “Connect to OneDrive.com”.
NOTE: Leave the Terminal window open. We will be using again later in this article.
07_clicking_connect_to_onedrive
On the “Connect to OneDrive.com” dialog box, enter your Microsoft email address and password and click “Sign in.”
08_connect_to_onedrive_dialog
Another dialog box displays telling you that OneDrive-D needs permission to access your OneDrive info. To continue, click “Yes.”
09_permission_dialog
A message displays above the “Connect to OneDrive.com” button indicating that you have connected to your OneDrive account.
Now you need to select a directory on your hard drive into which the content from your OneDrive account will be synced. You can do this in a Terminal window (as described in our article about using the Linux Terminal) or in the Files Manager.
Once you’ve created a directory for your OneDrive content, click the “Location” drop-down list and select “Other…”.
10_selecting_other
On the “Choose your local OneDrive folder” dialog box, navigate to the directory you created for your OneDrive content and click “Open.”
NOTE: If you need to create a new folder, use the “Create Folder” button.
11_choosing_local_onedrive_folder
By default, all the check boxes are selected in the “Exclusions” section for types of files you want to exclude when syncing. If you don’t want to exclude certain types, de-select the applicable check boxes. Once you’ve finished choosing your settings, click “OK.”
12_clicking_ok
A message displays telling you that your preferences were saved successfully. Click “OK” to close the dialog box.
13_preferences_saved
You are returned to the “Settings” dialog box. Click “Close.”
14_clicking_close
Now, you must tell OneDrive-D to sync with OneDrive to get your content into the directory you specified. To do this, go back to your open Terminal window and type the following command at the prompt and press “Enter.”
onedrive-d
15_syncing_content
The syncing process starts and the progress displays in the Terminal window.
16_sync_in_terminal
You will also see notifications on the right side of the screen as files are synced.
17_sync_notifications
When the syncing is done, OneDrive-D sets up “watches.” This allows OneDrive-D to sync in real time as you make changes to files in the synced directory or add files to or remove files from the directory.
18_setting_up_watches
For the watch to continue to work, you must leave the Terminal window open. If you close the Terminal window, the following message displays. If you really want to end the watch process, click “Close Terminal.” Otherwise, click “Cancel” to continue running the watch.
If you make changes to your OneDrive content on multiple computers or other devices, such as a phone or tablet, you may want to automatically sync your content when you boot your Ubuntu machine. To do this,add OneDrive-D to the startup applications. You should have an item similar to the OneDrive Sync item in the image below. Make sure it’s checked and click “Close.”
You can also add a shortcut to the desktop so you can quickly run OneDrive-D to sync your OneDrive content, if you didn’t add the program to startup, or if you just want to sync again while still logged into your session.
NOTE: The article linked to here about adding shortcuts to the desktop refers to Ubuntu 11.04 and 11.10. However, the process still works in Ubuntu 14.04.
When you double-click the shortcut, any changes you made to the synced folder are uploaded to OneDrive and any changes you made outside of Ubuntu are downloaded to your synced folder in Ubuntu.
24_syncing_on_startup
When you use the shortcut to run OneDrive-D and sync your OneDrive content, the program remains running in the background. If you don’t want it to continue running, you can use the “ps” and “kill” commands to kill the process. 
#Thanks for Reading